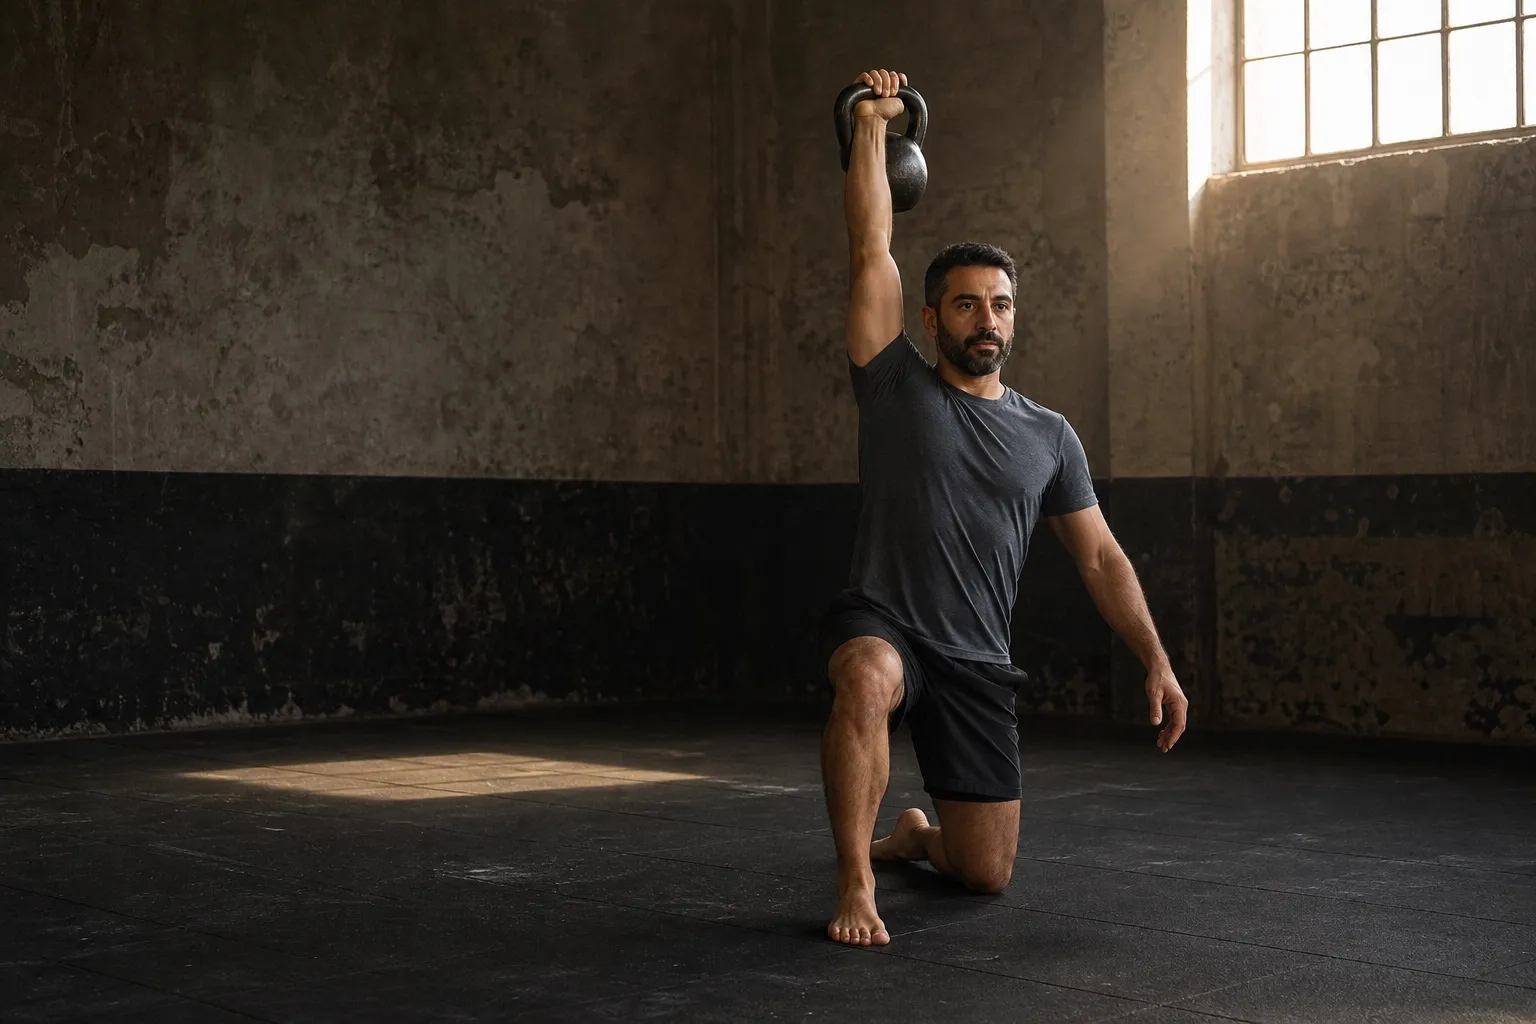
The Turkish get-up moves you from lying on the floor to standing while you keep a kettlebell overhead. Then you retrace the route to the floor. One repetition is slow, deliberate, and made of several distinct positions.
Treat those positions as checkpoints:
- Lie on your back and secure the bell above your shoulder.
- Roll to the opposite elbow.
- Post on the opposite hand.
- Lift your hips and sweep the straight leg underneath you.
- Settle into half-kneeling.
- Square your legs and stand.
- Reverse every step to return the bell to the floor.
The goal is not to complete the sequence as quickly as possible. The goal is to arrive at each checkpoint with enough control to pause, breathe, and see the bell.
Learn the route without weight
Start with an empty hand. Make a fist and keep your knuckles directed toward the ceiling as though you were holding a bell. Learn where the supporting hand and moving leg belong before adding load.
You can balance a light object on your closed fist if you want immediate feedback. If the hand wanders or tips, the object will tell you. It should be something soft and harmless if it falls.
Clear enough floor to lie fully extended and sweep one leg beneath you. A mat should not bunch, slide, or catch your foot. Move nearby bells outside the path.
If you are preparing for a longer session, the kettlebell warm-up guide gives you a short sequence for rehearsing the squat, hinge, and loaded positions first.
Set up the starting position
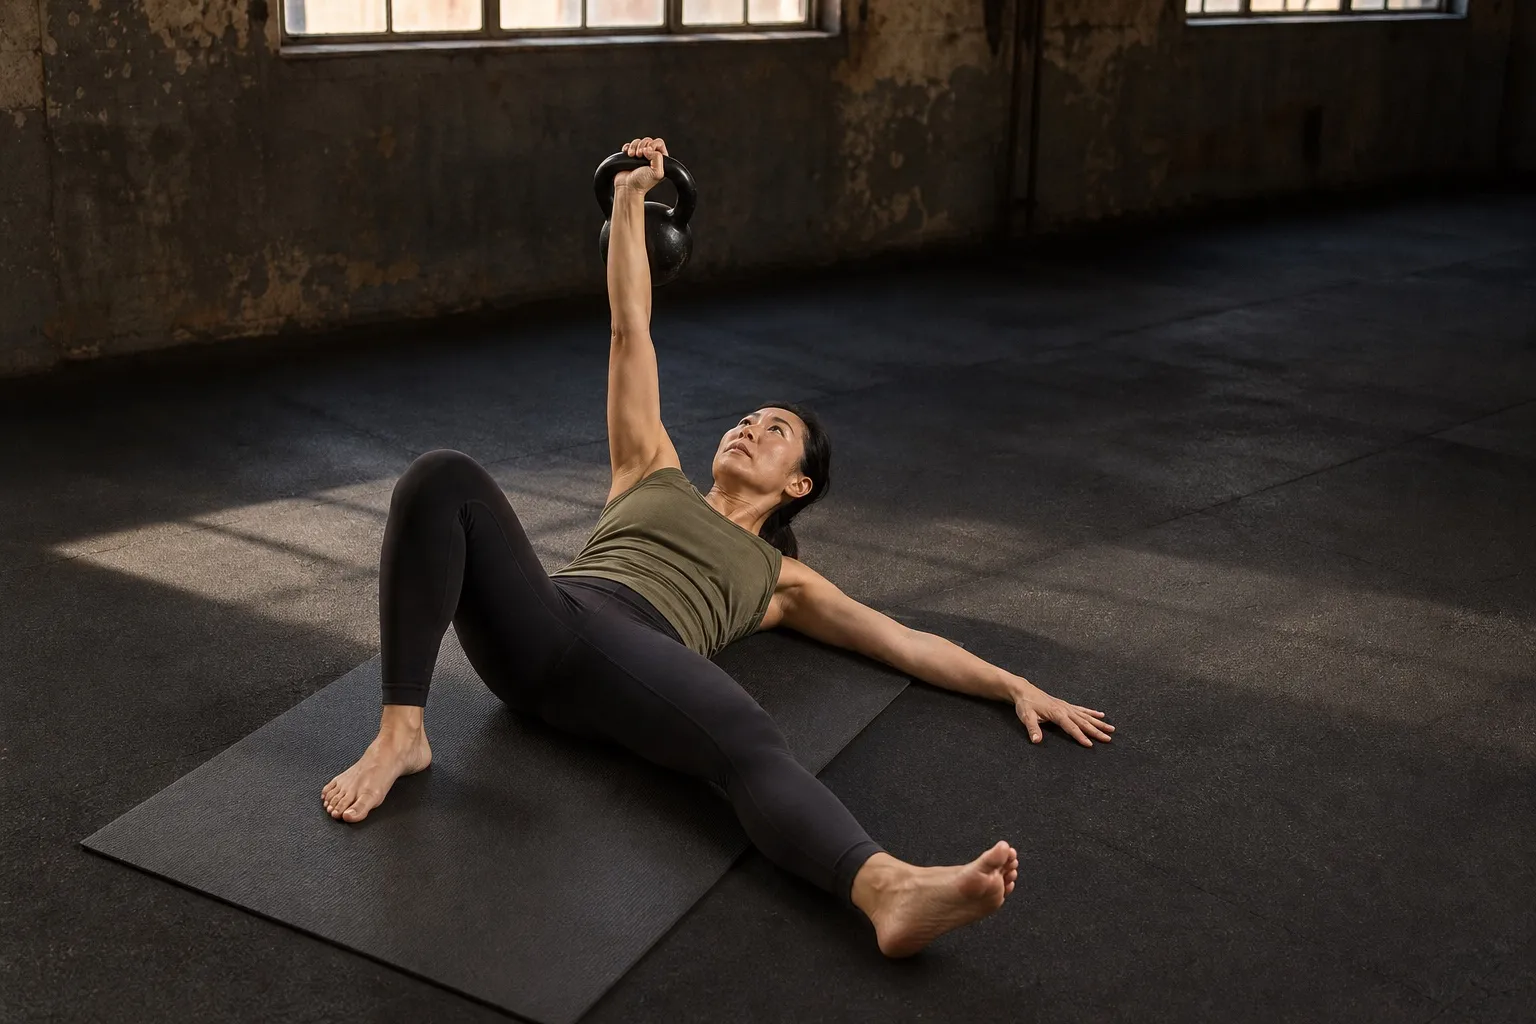
Lie on your back with the kettlebell on the floor beside the shoulder that will work. Roll toward it, take the handle with both hands, and pull it close to your torso. Roll onto your back with the bell held securely, then use both hands to guide it above the working shoulder.
Do not curl the bell from the floor with one arm. Bringing it close before you roll keeps the awkward part of the setup small and controlled.
Once the bell is overhead:
- keep the working elbow straight without forcing it past its natural position;
- stack the bell over the shoulder rather than letting it drift toward your head;
- bend the knee on the bell side and plant that foot;
- extend the opposite leg on a slight diagonal; and
- place the free arm on the floor roughly 45 degrees from your torso.
Look at the kettlebell. Keep looking at it through the floor transitions, where the bell is most likely to move relative to you.
Step 1: Roll to your elbow
Press the planted foot into the floor and roll toward the straight arm. Lead with your chest rather than trying to sit directly upward. The free forearm receives your weight, and the loaded arm stays pointed toward the ceiling.
At the elbow checkpoint, your shoulders should be separated from the floor and your chest turned partly toward the supporting side. Do not collapse into that shoulder. Press the forearm down so the torso stays tall enough to support the next move.
Pause. Confirm that the loaded wrist remains straight, the elbow remains long, and the bell is still stacked over the shoulder.
Step 2: Move from elbow to hand
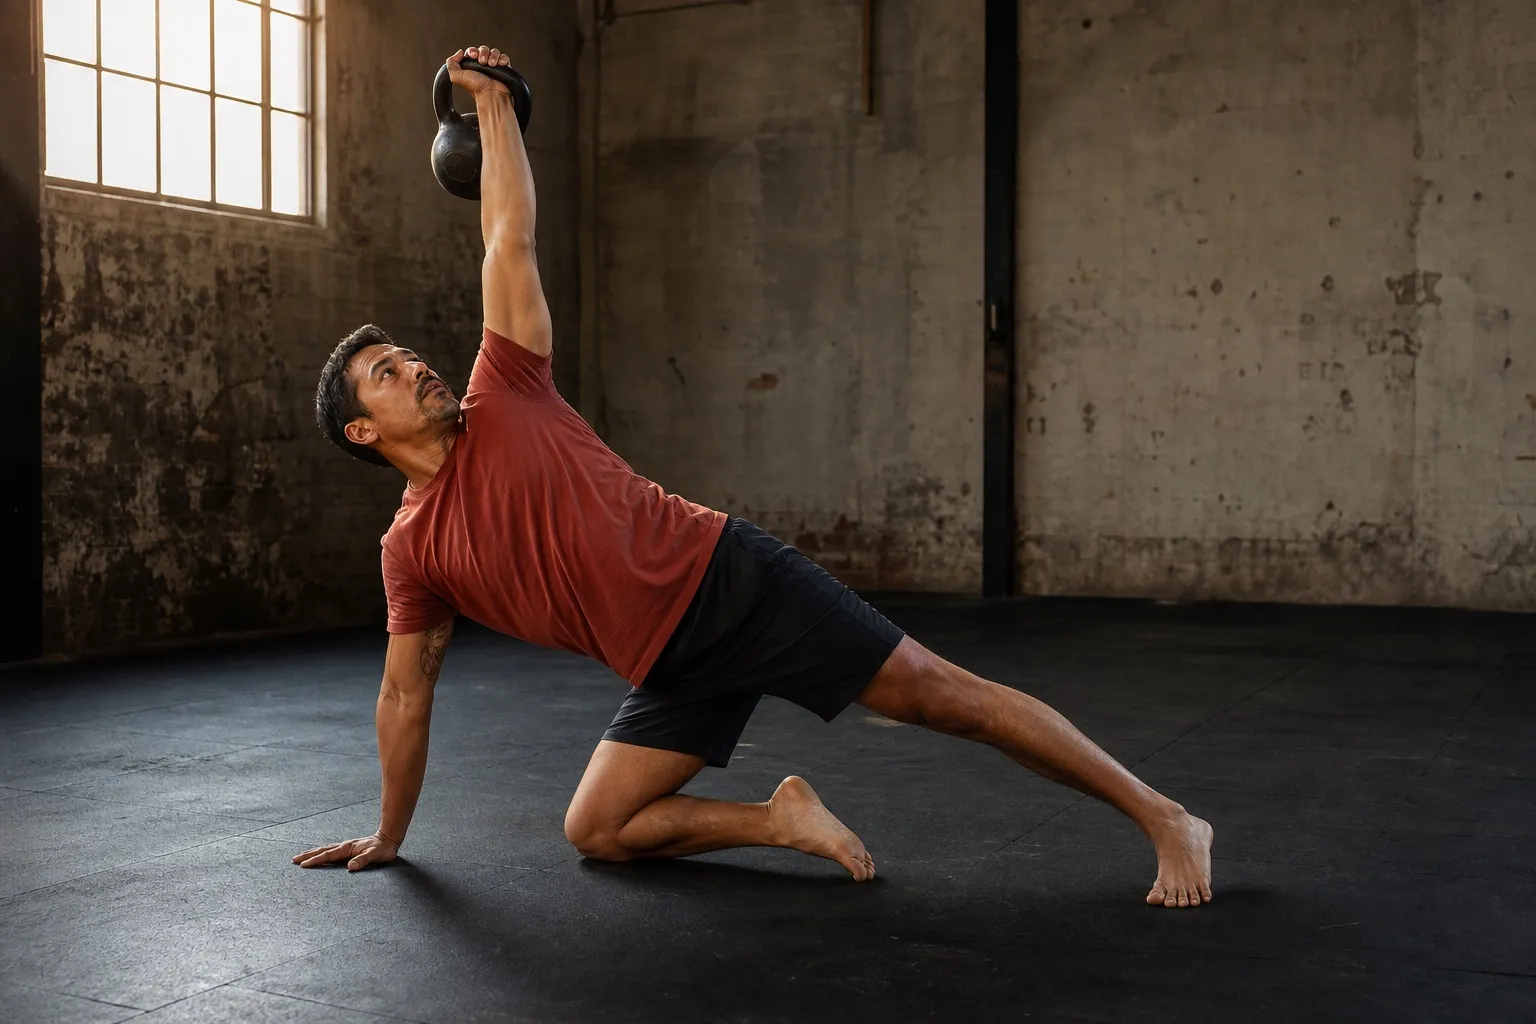
Straighten the supporting arm and place the palm where the elbow had been. You are not pushing the bell higher. You are changing the base underneath your torso.
Keep some space between the supporting shoulder and ear. The planted foot, straight-leg heel, and supporting hand now form three points of contact with the floor. The bell-side knee remains bent.
Adjust the supporting hand by a few inches if the next step feels crowded.
Step 3: Lift the hips
Drive through the planted foot and supporting hand to raise your hips. You need enough room to move the straight leg underneath you; you do not need to turn the bridge into a height contest.
The loaded arm remains vertical while the torso changes angle beneath it. If the bell starts drifting outside your base, lower the hips, reset the stack, and repeat the position before sweeping the leg.
Step 4: Sweep the leg to kneeling
Move the straight leg underneath your body and place that knee on the floor near the supporting hand. The lower leg will usually land at an angle behind you. Keep the supporting hand down until the knee is settled and your balance is clear.
Now shift your torso upright and lift the free hand from the floor. You should arrive in a windmill-like kneeling position: one knee down, the opposite foot planted, and the kettlebell overhead.
Step 5: Square the half-kneeling stance
Pivot the lower leg behind you until the back knee and front foot form a stable half-kneeling stance. You can move the lower leg in small steps. There is no prize for making the adjustment in one fast motion.
Once square, face forward with your torso tall. The front foot should be far enough ahead that you can stand without rocking backward or pushing off the floor with your free hand.
This checkpoint resembles the bottom of a split-stance rise: front foot flat, back knee down, and bell stacked over the working shoulder. Look forward once the stance is stable and the bell is no longer changing position relative to your body.
Step 6: Stand
Press through the front foot and rise to standing. Bring the rear foot forward until both feet are under you. Finish tall without leaning away from the bell.
Pause at the top. The bell, wrist, elbow, shoulder, torso, and feet should form a controlled stack. A completed repetition still includes the return, so do not relax the grip or rush into the descent.
Reverse the sequence
The way down follows the same checkpoints in reverse:
- Step the leg opposite the bell back and lower that knee to the floor.
- Pivot the lower leg out to make room for the supporting hand.
- Hinge sideways and place the free hand on the floor.
- Lift the hips enough to sweep the kneeling leg forward.
- Lower the hips, then lower from hand to elbow.
- Roll from the elbow onto your back.
- Use both hands to bring the bell to your torso, roll toward it, and set it down.
Do not drop directly from standing to the floor or improvise a shorter return. Reversing the route is half of the practice. It also leaves the bell in a secure position beside you instead of above you when the repetition ends.
Common mistakes
Starting with a bell that is too heavy
The get-up asks you to control a bell through changing body angles. A weight that feels easy during a single overhead press may still be too demanding for the transitions. Learn the empty-hand route, then use the lightest bell you can control. The beginner bell-sizing guide explains why the movement is a better test than a universal weight chart.
Watching the room instead of the bell
Keep your eyes on the kettlebell while you are on the floor and posting through the hand. Once you are stable in half-kneeling, you can shift your gaze forward for the stand. Looking away too early makes drift harder to notice.
Skipping the pauses
Speed can hide a weak position. Pause at the elbow, hand, high bridge, half-kneeling stance, and standing finish. If a checkpoint is not stable enough for one calm breath, reduce the load or practice that section alone.
Losing the overhead stack
The bell does not need to stay over one fixed spot on the floor. It stays supported over your shoulder as your torso turns and rises beneath it. Think about moving yourself under the bell rather than carrying the bell around the sequence.
Treating both sides as one set
A get-up on the left and a get-up on the right are separate work. One side may need a different hand placement or a longer pause. Record the sides explicitly so you do not forget where control changed.
A first practice session
Keep the first sessions short enough that every repetition stays deliberate:
- Perform 2 empty-hand get-ups per side.
- Practice the floor-to-elbow-to-hand sequence 3 times per side.
- With a light bell, perform 1 full get-up per side.
- Rest 60–120 seconds.
- Repeat for 3 rounds.
That gives you three loaded repetitions per side without turning any set into a race. If one transition remains unclear, stop the sequence there and practice only the steps you can control. A qualified coach can also help with hand placement and bell path from an angle you cannot see yourself.
Log the bell and side for every repetition. Pood lets you record left and right work separately, so a note such as “paused at the hand on the right” stays attached to the session rather than becoming a vague memory before the next one.
The get-up is easiest to learn as a route, not a stunt. Secure the bell, roll to the elbow, post to the hand, sweep to the knee, stand, and reverse. Own each checkpoint before you ask the whole sequence to carry more weight.